
How to Make a Kitchen Wall Cupboard: DIY Mastery

Having a well-organized kitchen is essential for efficient cooking and a pleasant cooking experience. One way to achieve this is by installing a wall cupboard. Not only does a wall cupboard provide valuable storage space, but it also adds to the aesthetic appeal of the kitchen. If you’re looking to add a personal touch to your kitchen and have some basic woodworking skills, making your own kitchen wall cupboard can be a rewarding project. In this guide, we’ll walk you through the process of making a kitchen wall cupboard from scratch.
Materials and Tools
Before you get started, it’s important to gather all the necessary materials and tools. Here’s a list of what you’ll need:
Materials:
- 3/4-inch plywood sheets
- Wood glue
- Wood screws
- Wood stain or paint
- Cabinet hardware (hinges, handles)
- Sandpaper
Tools:
- Table saw
- Power drill
- Router
- Clamps
- Measuring tape
- Paintbrushes or foam rollers
Step 1: Design and Measurements
The first step in making a kitchen wall cupboard is to plan out the design and take accurate measurements. Consider the space where you intend to install the cupboard and decide on the dimensions that will best suit your needs. Take into account the height, width, and depth of the cupboard, as well as the number of shelves you want to include.
Step 2: Cutting the Plywood
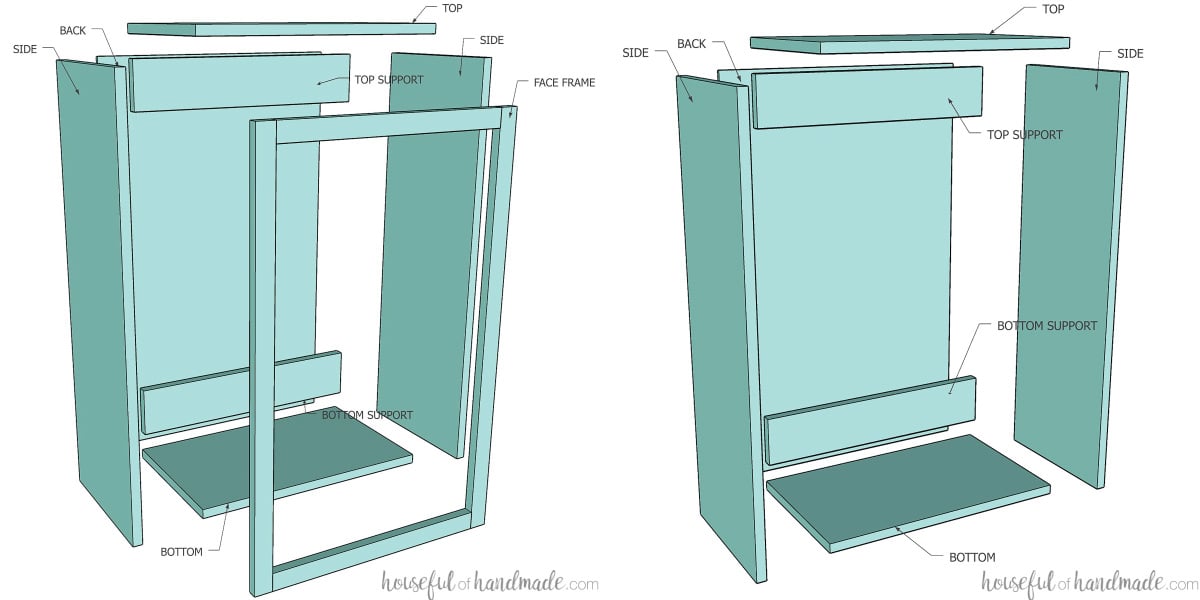
Once you have the design and measurements finalized, it’s time to cut the plywood sheets according to the dimensions you’ve decided on. Use a table saw to make precise cuts, ensuring that the pieces fit together seamlessly. You’ll need pieces for the top, bottom, sides, back, and shelves of the cupboard.
Credit: housefulofhandmade.com
Step 3: Assembling the Cupboard
Using wood glue and wood screws, assemble the pieces of plywood to create the basic structure of the cupboard. Start by attaching the sides to the top and bottom pieces, and then add the back panel. Make sure everything is square and level as you go along. Once the basic structure is assembled, you can add the shelves at your desired heights.

Credit: www.youtube.com
Step 4: Adding Doors
If you want your cupboard to have doors, you’ll need to cut additional pieces of plywood to create the door panels. Use a router to create a groove along the edges of the door panels where the hinges will be attached. Once the door panels are ready, attach the hinges and then mount the doors onto the cupboard.
Step 5: Sanding and Finishing
After the cupboard is fully assembled, it’s time to sand the surfaces to ensure a smooth finish. Start with coarse sandpaper to remove any rough edges and then gradually move to finer sandpaper for a polished look. Once the sanding is complete, you can apply a wood stain or paint of your choice to give the cupboard a professional and stylish appearance.
Step 6: Installing Hardware
Lastly, install the cabinet hardware such as hinges and handles to complete the cupboard. Make sure the hardware is securely attached and aligns properly for smooth opening and closing of the doors. Take your time to ensure that everything is well-fitted and functions as it should.
Frequently Asked Questions
How Many Shelves Should A Kitchen Wall Cupboard Have?
A standard kitchen wall cupboard usually has two to three shelves for optimal storage.
What Materials Are Commonly Used To Make Kitchen Wall Cupboards?
Common materials for kitchen wall cupboards include wood, MDF, plywood, and laminate for durability.
What Is The Ideal Depth For A Kitchen Wall Cupboard?
The ideal depth for a kitchen wall cupboard is typically between 12 to 24 inches for usability.
How Can I Customize The Design Of My Kitchen Wall Cupboard?
You can customize the design of your kitchen wall cupboard by choosing unique finishes, handles, and knobs.
Conclusion
Making your own kitchen wall cupboard can be a fulfilling and cost-effective project that allows you to customize the storage space in your kitchen according to your specific needs and style preferences. With the right materials, tools, and a bit of patience, you can create a beautiful and functional cupboard that will enhance the organization and visual appeal of your kitchen.
Now that you have a step-by-step guide, why not give it a try? Not only will you save money, but you’ll also have the satisfaction of knowing that you created a piece of furniture that is both practical and attractive.


